

Fireplace Insert Installation: Step by Step Guide
Fireplaces bring warmth, comfort, and style to any home. However, traditional wood-burning fireplaces often waste energy and require constant maintenance. That’s where a fireplace insert comes in. Installing one transforms your old fireplace into an efficient heating system while keeping the cozy ambiance.
What Is a Fireplace Insert?
A fireplace insert is a self-contained heating unit that fits inside your existing fireplace opening. It typically comes in wood-burning, gas, or electric options. Unlike open fireplaces, inserts improve efficiency by using a sealed system, reducing heat loss and smoke.
Benefits of Installing a Fireplace Insert
- Energy Efficiency:
Keeps heat inside your home instead of losing it through the chimney. - Lower Costs:
Reduces heating bills in the long run. - Clean Air:
Modern inserts release fewer emissions. - Design Upgrade:
Gives your living room a stylish, modern touch. - Flexibility:
Choose from wood, gas, or electric inserts depending on your needs.
Here’s a related guide for you to check it out:
Faux Fireplace Inserts: Cozy & Easy Ambiance
Tools and Materials You’ll Need
Before starting, gather the following:
- Measuring tape
- Screwdrivers and wrench set
- Insulation materials
- Venting kit (for wood or gas inserts)
- Fireproof sealant
- Protective gloves and goggles
Step-by-Step Fireplace Insert Installation Guide
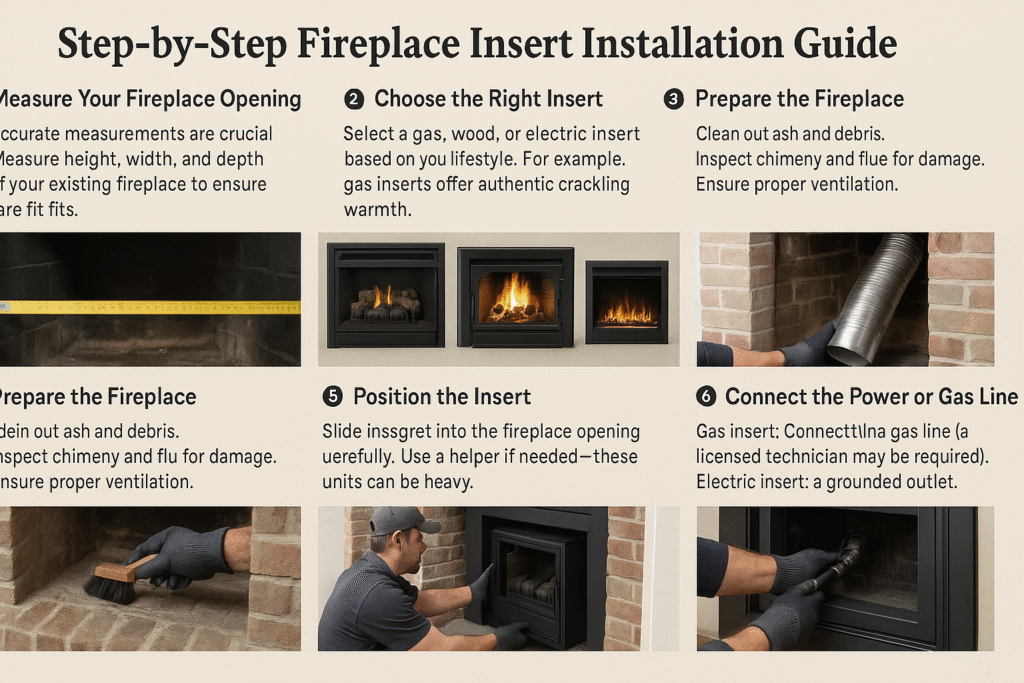
1. Measure Your Fireplace Opening
Accurate measurements are crucial. Measure height, width, and depth of your existing fireplace to ensure the insert fits.
2. Choose the Right Insert
Select a gas, wood, or electric insert based on your lifestyle. For example, gas inserts offer convenience, while wood inserts provide authentic crackling warmth.
3. Prepare the Fireplace
- Clean out ash and debris.
- Inspect chimney and flue for damage.
- Ensure proper ventilation.
4. Install the Venting System
For wood and gas inserts, proper venting is essential. Most systems use a stainless-steel liner running up the chimney.
5. Position the Insert
Slide the insert into the fireplace opening carefully. Use a helper if needed—these units can be heavy.
6. Connect the Power or Gas Line
- Gas insert: Connect to an existing gas line (a licensed technician may be required).
- Electric insert: Plug into a grounded outlet.
- Wood insert: Ensure the chimney liner is securely attached.
7. Seal and Finish
Apply fireproof sealant around the insert edges. Attach trim panels to give a clean, polished look.
Common Mistakes to Avoid
- Choosing the wrong size insert
- Ignoring chimney cleaning before installation
- Skipping professional help for gas or vented inserts
- Not sealing gaps properly, leading to heat loss
Safety Tips for Fireplace Insert Installation
- Always wear protective gear.
- Ensure your home has a working carbon monoxide detector.
- Follow the manufacturer’s manual closely.
- Hire a licensed technician for gas line or electrical work.
- Schedule annual chimney inspections for safety.
Cost of Fireplace Insert Installation
The cost depends on type and complexity:
- Electric insert: $500 – $2,000 (easiest to install)
- Gas insert: $2,000 – $4,500 (requires professional setup)
- Wood insert: $3,000 – $5,000 (includes chimney lining)
DIY can save on labor, but mistakes may lead to costly repairs.
Professional vs. DIY: Which Is Right for You?
- DIY:
Best for electric inserts or if you’re experienced with home projects. - Professional:
Recommended for gas and wood inserts due to venting and safety concerns.
Think of it this way: if your installation involves gas lines, electrical work, or chimney modifications, hiring a professional is the safer choice.
Conclusion
A Fireplace Insert Installation can dramatically improve your home’s efficiency, comfort, and style. Whether you go with a wood, gas, or electric insert, following proper steps ensures safety and performance. If in doubt, always consult a professional to avoid risks. With the right preparation, your new fireplace insert will bring warmth and beauty for years to come.